With the plan to sail ÅFOR 2019, a 350 nautical miles off-shore race, the finish on the hull needed some improvement. The finish on the hull was in ok shape but not enough when your friends are race nerds. The hull needed to be in a 320 grit finish for it to be acceptable for them.
The antifouling on the hull was VC17, which is a hard antifouling that can be sanded to improve the finish. Once we got together to discuss the race, we also inspected the current finish.
At a few places, the CV17 had flaked. Flaking is not normal for VC17, but since it was in such minimal areas, it had not concerned me before. But to inspect, we scraped a bit with a paint scraper.
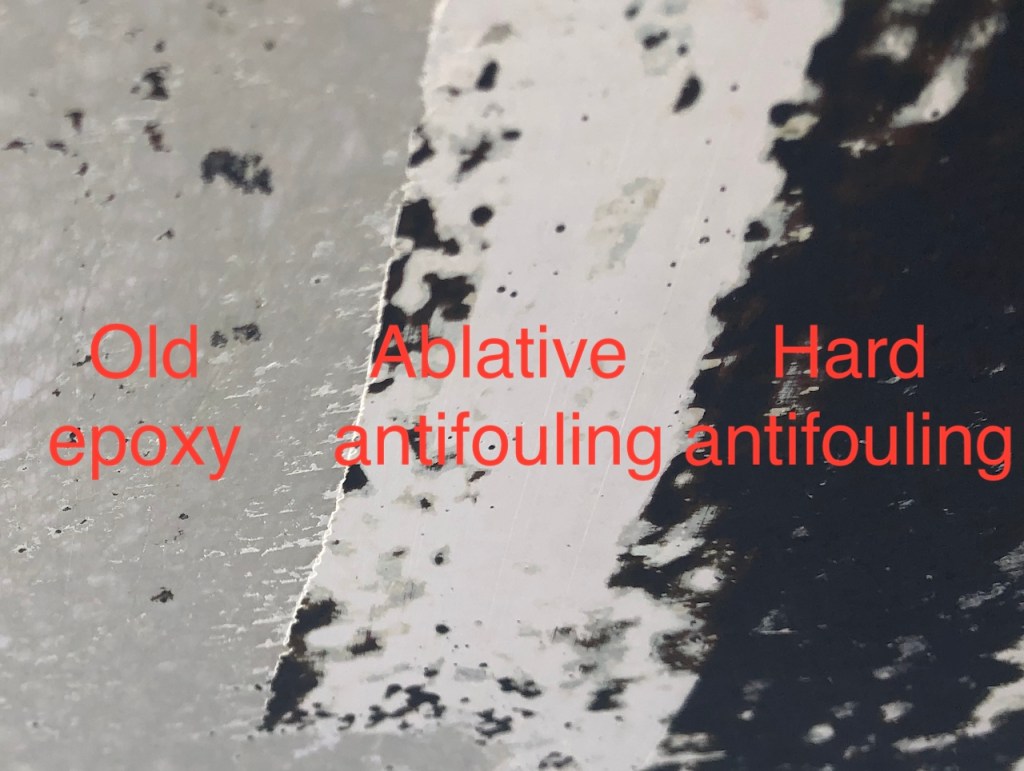
We could then clearly see that between the layers of epoxy and the hard VC17 antifouling, there were some layers of ablative antifouling. There was no way we were going to get a race finish when we had an ablative antifouling under the hard antifouling. All antifouling had to come off!
The plan now was to scrape all the old antifouling off and sand the existing epoxy that seemed to be thick to a 320 grit finish. We would then add a primer and a new antifouling next winter.
Since scraping antifouling is not healthy for the person scraping or the environment, I found a scraper that could be hooked up to vacuum machines. With the scrapers hooked up to vacuum machines, we could avoid covering both the boat and the ground beneath the boat from the antifouling scraped off.
The scraping went reasonably smoothly. With the ablative antifouling, the old antifouling came off fairly easy. And after scraping the hull was ready for sanding.
After starting to sand with first 120 grit and then a second round with 180 grit I realize that the existing layers of epoxy was not as thick as I had hoped. More layers of epoxy had to be added and sanded as well!
At some patches, I had burned through the epoxy to the gelcoat.
After doing some research, I ended up choosing the NM Böldspärr FS 023. This epoxy is a bit thicker than the regular epoxy for protecting the hull. Two coats should be enough but to give extra protection and also room for sanding. I decided to go with three layers.
After a lot of consulting with NM, even the lab engineers at NM, they were very clear that their epoxy should not be applied wet-on-wet. Instead, it should be applied and then cured before sanding to 180 grit before adding the next layer.
The lab engineers also recommended a different technique than what I had used before when applying the epoxy. Instead of using the mohair roller that I used to use, they suggested using a microfiber roller with a large diameter and a high-quality brush to even out the surface.
With one person using a roller and one person going behind finishing up with a high-quality brush, the result was excellent.
The challenge was sanding the curing time and the sanding of the epoxy. After applying the epoxy, I had to measure the temperature to get it cured enough and ended up having to wait 3-7 days before I could sand. I also had to wait a minimum of 7 days before the boat could be launched.
The NM epoxy is almost transparent, even if I choose the white epoxy. You can clearly see where I burned through the old epoxy to the blue gelcoat after applying the epoxy
But the NM epoxy is also extremely hard and tough once it’s cured. Sanding the NM epoxy is a nightmare, its like sanding glass. All the blank spots had to be sanded down to have a nice area for the next layer to stick.
The Abranet mesh sandpaper that I used was a lifesaver. These sandpapers cost a fortune on the regular DYI stores, but by ordering them in bulk online, the price is acceptable. With these sandpaper, the job of sanding was somewhat less of a pain. But the workload of having to sand the super hard NM epoxy between all layers is not something I would repeat. I would recommend everyone to use a mesh sandpaper when sanding the hull.

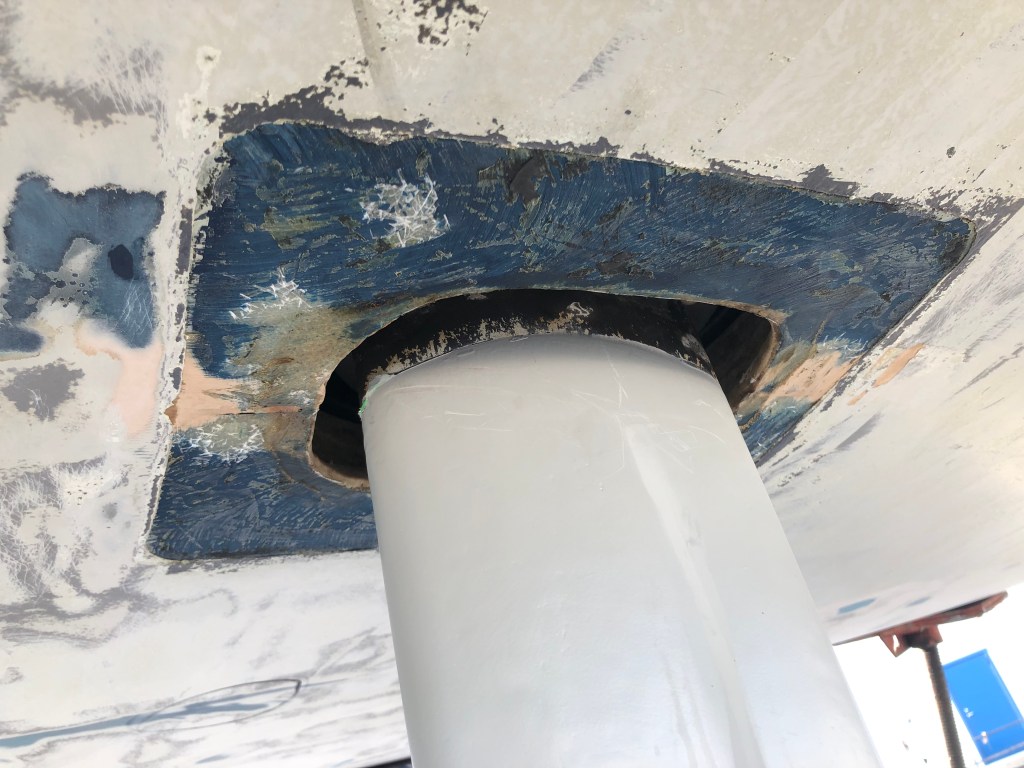
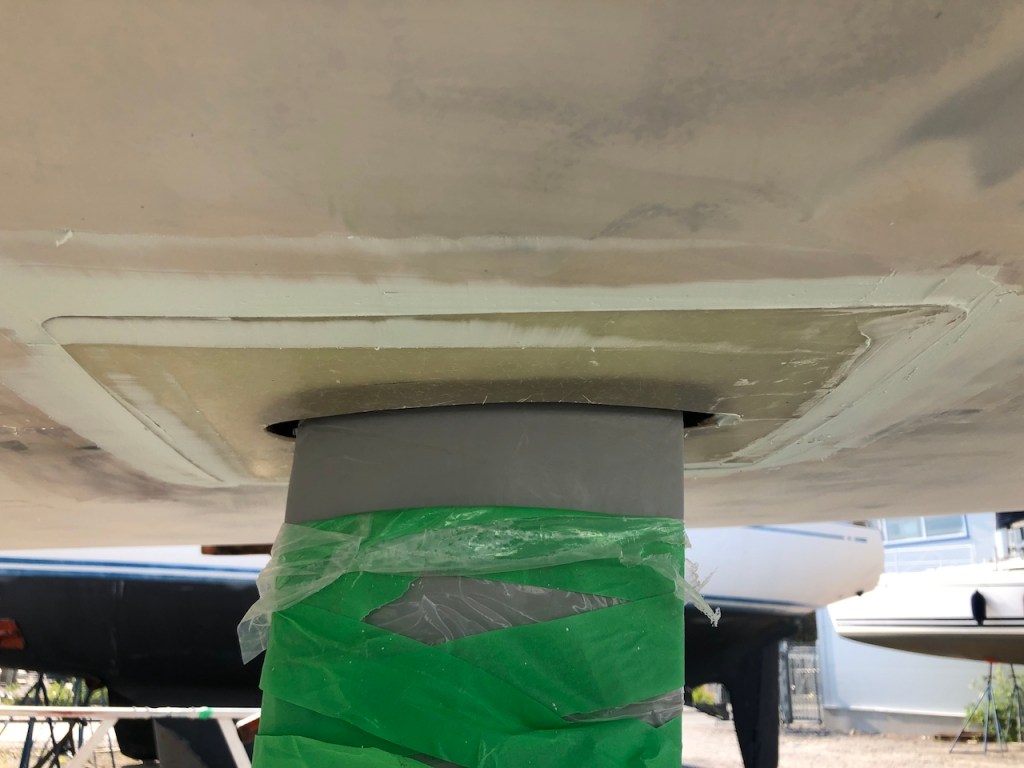
Why not add a bit more work? When I got the cull in such nice shape, I thought the rubber seal around the saildrive was sticking out. To get a smoother finish, I added a glass fiber plate instead, using a light putty so it could be removed if the saildrive needed to be accessed. The fiber glass plate was added between the second and third layer of epoxy so the plate would also get one some layers of epoxy.
With all the scraping, sanding, laying epoxy, waiting on cure times, etc. There was no way to get everything done before ÅFOR 2019.
After I had applied the last layer of epoxy, I decided not to use any antifouling. The antifouling we want to use when sailing to the Caribbean is not an antifouling we wish to use in Sweden. The next winter, I didn’t want to start over and remove another layer of antifouling again.
I am super happy with the result, but the workload was massive. If I would redo the work, I would probably choose a different epoxy that could be applied wet-on-wet to reduce the workload of sanding between layers.
But I now have a very thick layer of epoxy on top of the gelcoat. Some layers from the original epoxy are still there, and I also have three thick layers of epoxy where the recommendation is two layers of NM epoxy.
The plan was to remove the old antifouling the upcoming winter and then add a couple of coats of additional epoxy. But now all this is done and ready for final sanding before applying a primer and the new antifouling. I wish this would not have interfered with racing in ÅFOR and be so stressful with the time constraints.
Steps involved, estimated hull area: 38 m2
- Scraping entire hull
- Sanding entire hull with 120 grit
- Washing hull with water
- Sanding entire hull with 180 grit
- Washing hull with water and then acetone
- The first layer of epoxy
- Sanding entire hull with 180 grit
- Washing hull with water and then acetone
- The second layer of epoxy
- Sanding entire hull with 180 grit
- Washing hull with water and then acetone
- The third layer of epoxy
The work was done in May to June 2019 and the post was written in November 2019
I want to thank the Martin Klinga for giving me a hand with some sanding and coating epoxy.
